By Marty Gallagher
Overhead Dumbbell Press
Key Technical Points
- Clean the dumbbells to the shoulders and either stand or sit.
- If standing lock out thighs, glutes and tense torso: lean back slightly.
- If seated, maintain leg and torso tension throughout; don’t go limp.
- Keep pressure in the lower trunk via diaphragmatic breath.
- Press the bells overhead – up and in, the bell path forms a reverse V.
- Hard and complete lockout.
- Inhale in synchronization with the descent.
- Pull the bells down with tension. No freefall.
- Slow the poundage as it approaches the turnaround and pause.
- Lower to hairline or bottom of the ears.
- Push overhead explosively.
Overhead Barbell Press
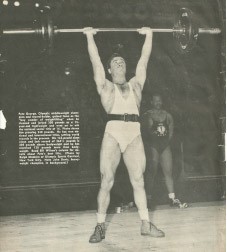
Olympic champion Pete George illustrates perfect press lockout position. Note flexed legs and slight lay-back. The clean and press has become extinct: nowadays trainees sit and press exclusively; often using inferior press machines. While there is a place for seated lifts, standing barbell and dumbbell presses are the most difficult and therefore the eternal choice of the hardcore elite.
Key Technical Points
- Clean the barbell or take weight out of a squat rack, stepping back.
- If standing, lie back slightly; tense legs and glutes to create push platform.
- If seated, set bench one notch below 90-degrees.
- If seated, maintain leg and torso tension.
- Both standing and seated, press bar as close to face as possible.
- Lock out hard and hold lockout.
- Lower with ever-increasing tension.
- Lower to below the chin: no half reps or partial reps.
- Barbell goes up and back ending locked out directly over the skull.
- Finish standing press by pushing the laid-back inclined torso erect.
- Lower with tension and recline slightly to achieve incline push position.
Press-Behind the Neck
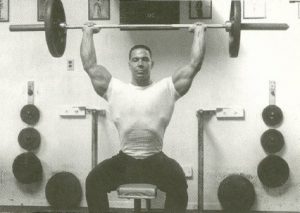
Bill Pearl: seated press-behind neck; note grip width. We avoid Bill’s thumb-less grip.
Key Technical Points
- PBN can be done standing or seated.
- Grip width is wider than shoulder width: note Pearl photo.
- Set up as if to squat with wide grip width, step back as if to squat.
- If seated, position bench behind squat rack, step back and sit down.
- On seated, sit – but don’t relax leg tension; push off tense legs.
- Standing: lock out legs and torso, push head forward, push upward.
- As bar clears back of head, allow bar path to move forward.
- Completed lock out has bar directly over top of head.
- Lower down and back with ever-increasing tension.
- Lower to hairline.
- At turnaround, push upward without hitting back of skull.
- Lock-out hard and hold for a beat before lowering.
- Inhale on descent, exhale on ascent.
Steep Incline Dumbbell Bench Press
Key Technical Points
- Set bench lower than 90-degrees and higher than 45-degrees.
- Use dumbbells for safety: barbell with spotters.
- Push straight up – bells touch at completion of each rep.
- Lock out hard.
- Lower with ever increasing tension.
- Turnaround is just below chin.
- Throughout the set never lose torso or leg muscle tension.
- Inhale on descent, exhale while pushing to lockout.
45-Degree Incline Dumbbell Bench Press
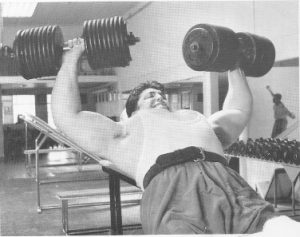
Pat Casey again, this time pushing a pair of 200 pound dumbbells, 400 pounds total, for five reps. In this display of raw power, Pat has muscled these monsters into start position without assistance. This shot was taken in 1965 at Bill Pearl’s old gym on Manchester Avenue in Los Angeles.
Key Technical Points
- Set bench pad to 45-degree angle: fixed incline benches are 45-degrees.
- Stand in front of incline bench with dumbbells on the floor.
- Clean them to shoulders.
- Sit down onto the bench pad, maintaining leg tension.
- Once in start position; push bells upward and back.
- Follow all technical points addressed in the steep incline press.
- Never push dumbbells up and out as they will get away from you.
How to Periodize
In the world of strength training the use of periodization is standard operating procedure and should become an integral part of your training. Periodization is another word for preplanning. Elite strength athletes will lay out 3-4 months of preplanned workouts ahead of time; identifying target poundage, number of sets and reps for each and every workout.
Hall of Fame lifter (and current world record holder) Kirk Karwoski and I would lay out his periodized training template twice a year: before the national championships and world championships. For the last few years of his career he was able to complete an entire 12-week periodized game plan without missing a single preplanned set, rep and poundage target. Other greats such as Ed Coan and Doug Furnas were equally adept.
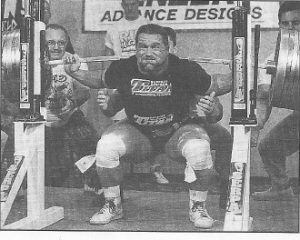
Kirk Karwoski squats 1003 pounds at the 1995 Nationals.
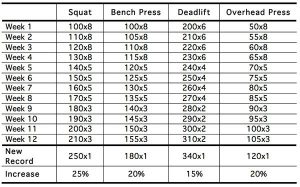
Here is how an individual with a 200 pound squat, a 150 pound bench press, a 300 pound deadlift and a 100 pound overhead press might lay out a 12 week periodized game plan. Each set and rep combination is performed after taking as many warm-up sets as needed.
This template can be modified and utilized regardless current strength levels.
Key Points
- All lifts start off at approximately 50% to 65% of current max
- All lifts end up roughly 15% to 25% above current max
- All lifts utilize pristine technique
- Optional: In early phases, multiple top sets can be used
- Never start off too high or too low
Creating Your Own
Periodized Training Template
In a nutshell, the way to periodize or “cycle” any lift is as follows….
- Create a realistic goal
- Establish a realistic timeframe
- Reverse engineer: work backwards with a calendar, pen and legal pad
- Place the realist goals within a specified timeframe
- Work backwards to establish weekly poundage benchmarks
- Every 3-4 weeks alter the variables in anticipation of stagnation
- When instituting changes, make them dramatic, not minor
Scenario: let us assume a 195 pound individual is athletic, but slightly out-of-shape coming off the winter holidays; he wants to take ten weeks to lean out and shape up. His previous deadlift best was 390×1 and his leanest, most athletic and functional bodyweight in the past has been 185-188 pounds.
In ten weeks time our hypothetical individual has morphed from a soft 195 into a rock hard 180 pounds. His deadlift, a great overall strength indicator, has leapt upward by a full 10%, from 390 for 1 rep to 435 for 1. He has regained his cardio condition by tweaking his run durations and weekly frequencies. In 70 days he has gotten himself into prime fighting condition. This is a fairly conservative example and mirrors what I do with clients and students every single week.
